After logging in you can set up the Network configuration in two steps:
- Assign an IP address to each NIC on your server
- Assign a default gateway and one or two DNSes
2.1.1 Assign an IP address to each NIC
To achieve this first goal you select the Interfaces in the section SERVER CONFIGURATION, from the main menu.

In the page body an interface such the one in fig. 1 shows you all the NIC actually detected. Click on the NIC's name (in our example it's "eth0").
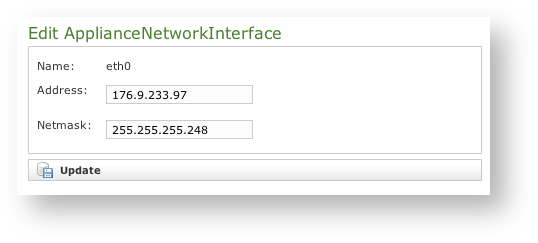
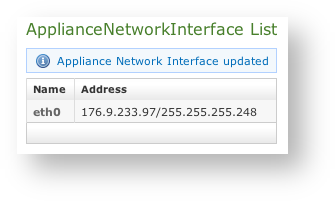
The page body will change as in fig. 2.
Configure the eth0 interface with the following parameters:
- IP address
- Network Mask
Pay attention to change your workstation IP accordingly to the new server's NIC configuration: else you can lose the access to the server and to the server's Web console.
2.1.2 Assign a default gateway and DNS(es)

Configure the eth0 interface with the following parameters:
- Default Gateway (mandatory to reach out the Internet)
- Dns Server Primary (mandatory to resolve domains and hostnames into IP addresses)
- Dns Server Secondary (optional)
- Appliance hostname

The gateway configuration can break up the communication between the server and your workstation. Take care to check both before applying.
2.1.3 Manual Network configuration
Both the above procedures are possible via console access, using the SSH internal server. Gain a privilege access to the console using the "root" user.
2.1.3.1 Assign an IP address to each NIC
To manually assign an IP address to a specified NIC you should use the iface-configure.sh script located in /data/bin/. It accept the card name, the IP address to assign and its netmask as in the following example:
/data/bin/iface-configure.sh eth0 78.47.213.169 255.255.255.0
After you press the Enter key, the script configures and restarts the network configuration.

Beware that you pass to the script the correct values, else you could cut yourself out of the server.
To configure the NIC properly you must pass the three options specified above.
If called with no options, then the above script returns the actual NICs configuration.
After the script exits please restart the tomcat service as well using the command:
/data/bin/restart-http.sh
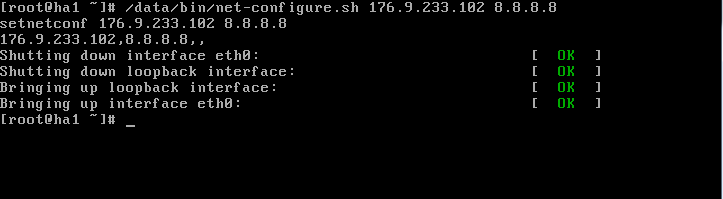
2.1.3.2 Assign a default gateway and DNS(es)
To manually assign an IP address to a specified NIC you should use the net-configure.sh script located in /data/bin/. It accept the gateway IP address and two DNS addresses as in the following example:
/data/bin/net-configure.sh 46.4.25.83 8.8.8.8 9.9.9.9
After you press the Enter key, the script configures and restarts the network configuration.
You can pass to the script just the gateway and the first DNS IP addresses. The second DNS IP address is optional
Beware you passed the correct values to the script or else you could cut yourself out of the server.
To configure the NIC properly you must pass almost the gateway and the first DNS server IP.
If called with no options, then the script return the actual network configuration.
2.1.4 Configure static routes
The following lines are partially excerpted from the http://www.centos.org/docs/5/html/5.1/Deployment_Guide/s1-networkscripts-static-routes.html page. All rights granted.
Static route configuration is stored in a /etc/sysconfig/network-scripts/route- file. For example, static routes for the eth0 interface would be stored in the interface/etc/sysconfig/network-scripts/route-eth0 file. The route- file has two formats: IP command arguments and network/netmask directives. We will refer just to the first case.interface
IP Command Arguments Format
Define a default gateway on the first line. This is only required if the default gateway you set above is not good for this NIC
defaultX.X.X.Xdevinterface
X.X.X.X is the IP address of the default gateway. The interface is the interface that is connected to, or can reach, the default gateway.
Define a static route. Each line is parsed as an individual route:
X.X.X.X/XviaX.X.X.Xdevinterface
X.X.X.X/X is the network number and netmask for the static route. X.X.X.X and interface are the IP address and interface for the default gateway respectively. The X.X.X.X address does not have to be the default gateway IP address. In most cases, X.X.X.X will be an IP address in a different subnet, and interface will be the interface that is connected to, or can reach, that subnet. Add as many static routes as required.
The following is a sample route-eth0 file using the IP command arguments format. The default gateway is 192.168.0.1, interface eth0. The two static routes are for the 10.10.10.0/24 and 172.16.1.0/24 networks:
default 192.168.0.1 dev eth0
10.10.10.0/24 via 192.168.0.1 dev eth0
172.16.1.0/24 via 192.168.0.1 dev eth0
Static routes should only be configured for other subnets. The above example is not necessary, since packets going to the 10.10.10.0/24 and 172.16.1.0/24 networks will use the default gateway anyway. Below is an example of setting static routes to a different subnet, on a machine in a 192.168.0.0/24 subnet. The example machine has an eth0 interface in the 192.168.0.0/24 subnet, and an eth1 interface (10.10.10.1) in the 10.10.10.0/24 subnet:
10.10.10.0/24 via 10.10.10.1 dev eth1
Duplicate Default Gateways
If the default gateway is already assigned from DHCP, the IP command arguments format can cause one of two errors during start-up, or when bringing up an interface from the down state using the ifup command: "RTNETLINK answers: File exists" or 'Error: either "to" is a duplicate, or "X.X.X.X" is a garbage.', where X.X.X.X is the gateway, or a different IP address. These errors can also occur if you have another route to another network using the default gateway. Both of these errors are safe to ignore.