2.3.1 Introduction
The certificates management is related to the server name and the services provided (please refer to 2.2 Network Segregation for details about the certificate assignation to a specific NIC/IP/name). In order to provide to the client a sure match of your identity you need to load and configure a secure certificate bonded to your server name (ie: name.server.tld).
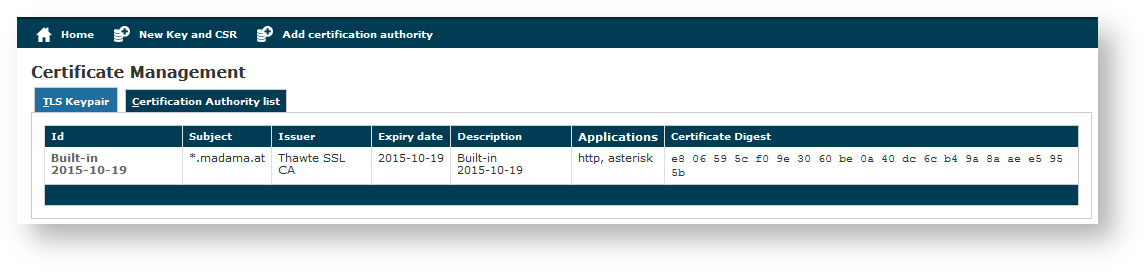
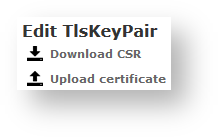
You can get the certificates configuration page using the Certificate Management link in the main menu. As shown above the default page is listing the installed TLS Keypair.
By default, on PrivateServer it's installed one "*.madama.at" wildcard certificate as shown in figure 1. Certificate configuration, default certificate installed
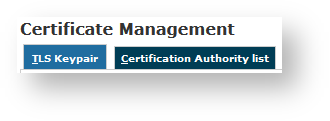
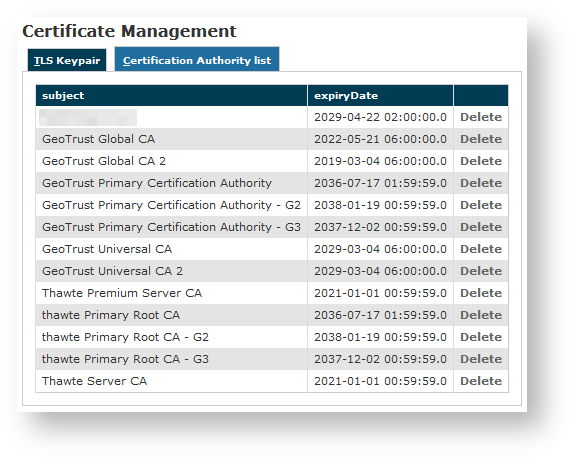
From this page you can decide to view and delete your keypairs or the Certification Authority entries, using the tabs shown in the above figure 2. The tabs to access the two section related with the certificate management.

Instead if you need to create a new TLS key pair or add a new CA, then you have to use the buttons above the "TLS Keypair" list (the ones shown in figure 3. link for creating new key and CSR or add new CAs).
2.3.2 Create New Certificate
Add a new Certificate is a delicate matter, because it involves sensible informations like private Key Management and concealing. Adding a New Certificate on PrivateServer means that you can create your own Certificate Signing Request directly on PrivateServer and no need for external Private Key creation/management tools. Of course you need to have your CSR signed by a known Certificate Authority before you can actually use it.
Certificate Creation is thus split in two steps:
- New Key and CSR creation (before CA sign)
- New Certificate upload (after CA sign)
New Key and CSR
So first of all you start by creating a CSR: click on the New Key and CSR link above the certificate table.

You are redirected on page shown in figure 4. New certificate form. Here you can fill the form with all basics data needed to create a Certificate Signing Request.
All the fields in above form are standard ones for creating new TLS Key pairs/Certificate Signing Requests.
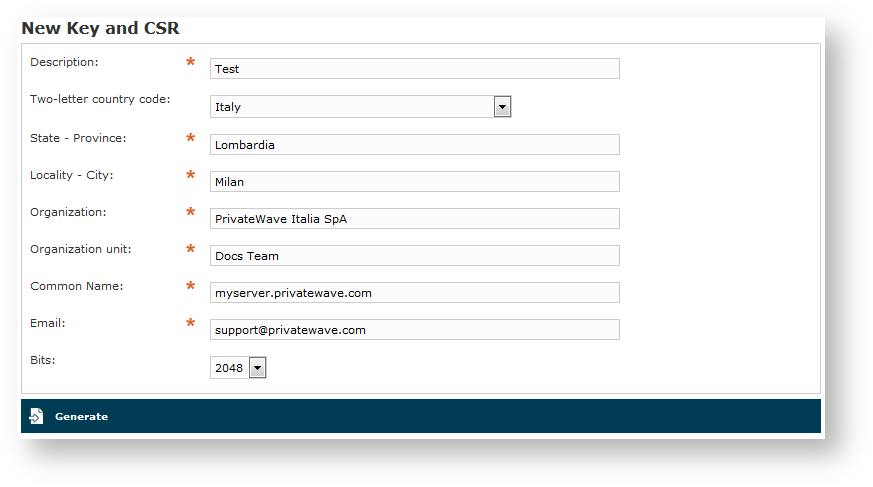
Once you're done you can just press Generate button at the bottom of the form.

A warning confirming creation and a new row in TLS Keypair list shows generation process has been successful.
Using this Certificate creation process you don't have to deal directly with Private Keys.
Now you can download your CSR to make a Certificate Authority sign it, creating a brand new Server Certificate.
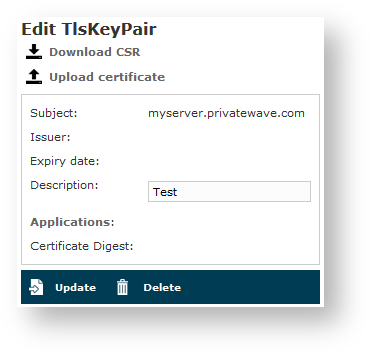
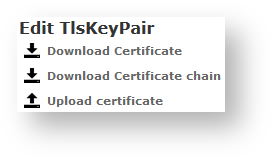
Just click on Certificate's name in main list and you get form shown in figure 7. Edit CSR form. From here you can fully manage your CSR, upgrading it to a proper Certificate or modifying its description.
Anyway you need to Download CSR before you're done with Certificate creation, so use first link shown in detailed view figure 8. CSR management links.
New Certificate upload
Once you have your CSR you just follow instructions by CA of your choice to obtain a new Certificate. As it's done, you can get back to form in figure 7. Edit CSR form and this time Upload certificate.

You can fill Certificate text box with actual Certificate as it has been release from Certificate Authority. If you got also some intermediate Certificate, then you have to paste it in Cert Chain.
All the fields must be in PEM (Privacy Enhanced Mail) format.
When your done you just press the Upload button on the bottom line: PrivateServer will validate entire Certificate Chain and if it went thought it then you should have a new line in you TLS/Keypair.
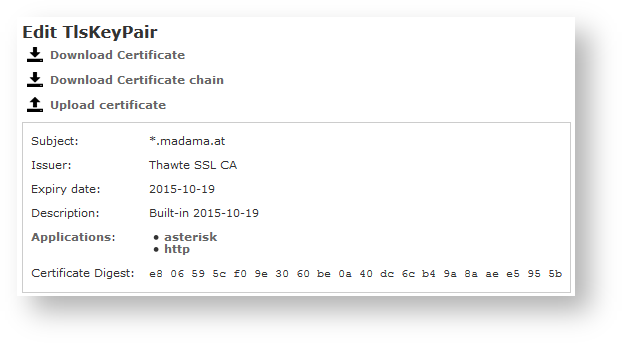
If you click on Certificate's Id then you can read Certificate's details as shown in figure 10. Details of the new Certificate.
You can notice that now you can also Download both Certificate and Certificate chain. Upload certificate can come handy in case of renewal.
Even if it's possible to extend Certificates validity period, PrivateWave Italia S.r.l. it is a good practice to create a fresh new CSR each time instead. We also think it is wise to keep validity period of each Certificate just one year long.
2.3.3 Add Certification Authority
You might need to upload a new CA (Certification Authority) if you tried to install a Certificate which wasn't signed by an installed CA.
By default PrivateServer contains a default list of pre-loaded Certification Authorities.
The new CA installation becomes mandatory because without a complete certificate chain the new TLS key pair would not be accepted by PrivateServer . If you need to upload a new certificate, click on the Add certification authority button above the certificate list table.

You get the form shown in figure 13. New Certification Authority which is pretty straightforward. You just have to cut 'n' paste the CA's content in the Certificate box and click on the Create button at the bottom.

As shown in figure 14. CA list updated the Certification Authority list shows a new entry. You can check the entry by subject (which is the entity that release the certificate) and the expiry Date (that shows how long the certificate is considered valid).
2.3.4 Delete TLS key pair
In a day-by-day secure VoIP service administration it's not unusual to delete a TLS key pair. The procedure starts right at the Certificate Management page (the one shown in figure 1. Certificate configuration, default certificate installed.

In figure 15. the TLS key pair list with a testing entry to be deleted you can see we added an entry conveniently named testing entry to be deleted and that's what we're going to do.
Please make sure no services got association with the TLS entry you're going to remove, or else the deletion would fail.
First you click on the chosen entry and get a detail of the TLS key pair (as in figure 10. Details of the new Certificate).

At the bottom of the form there's one Delete button. Just press it.
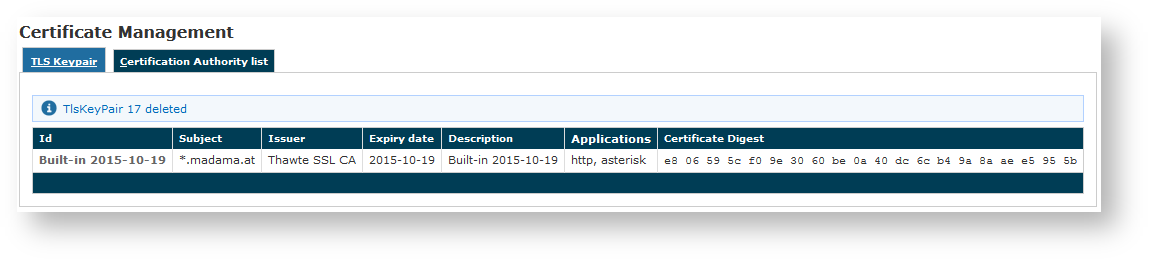
Confirm the deletion in the following pop-up windows. After that you get the new TLS key pair list without the deleted entry and with a warning which explains the entry has been deleted (as in figure 17. the deletion is confirmed).
2.3.5 Delete Certification Authority
You cannot edit an entry in the CA list, but you still can delete a CA and create a new one for replacement. That said, the way for deleting a CA entry is quite simple. From the CA list shown in figure 14. CA list updated choose the CA you want to expunge and press the Delete link in the last right column.
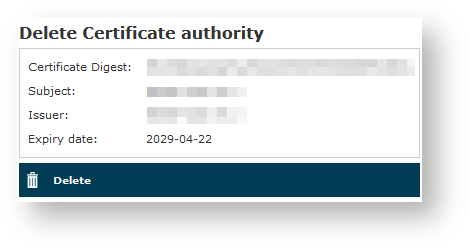
First you get a detail of the certificate you're going to delete. Just press the Delete button at the bottom and confirm your choice in the next pop up window.
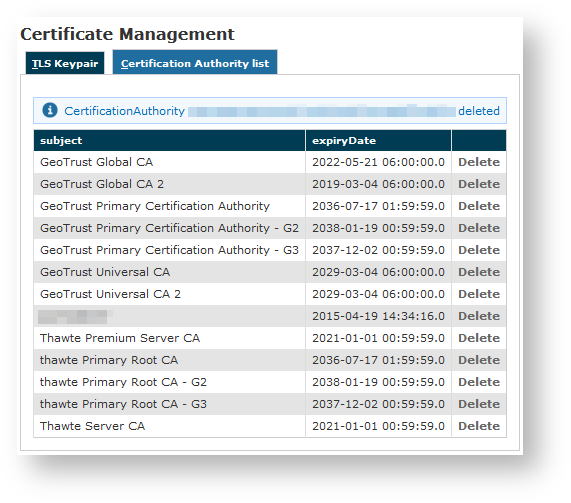
You receive a confirmation about the deletion in the new CA list page (shown above in figure 19. The CA list updated and the warning). Plus the list no more shows the deleted CA entry.