PrivateWave
Quick Start Guide for Android
This guide provides you easy step-by-step instructions to help you get started with PrivateWave Enterprise.
Secure calls with PrivateWave
Calling with PrivateWave is a very easy task. You can both use your contact list or directly dial a number using the dialpad.
To make a secure call, you and the called party must have PrivateWave software running on the mobile device, be connected to the Internet and to the same PrivateServer .
Select Contacts tab from the tab bar, tap on the contact you want to call and select the contact number associated with PrivateServer .
Calling by Contacts list
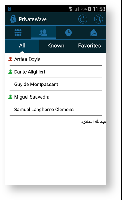
As you can see in figure 2. your address book is shared with application each contact can show a coloured ball at its left, or nothing at all. These are status marker and they represent the Presence Status for each contact.
Presence
The Presence avoid users to call contacts who are not reachable, eg: because they do not have PrivateWave activated and/or connected. The main value of this feature is to improve user experience suggesting the possible outcome of a call.
Contacts lists
- ALL: it lists all the contacts which are in the mobile address book, ordering them in the very same way.
- KNOWN: it shows only known contacts (registered or not) according to PrivateServer 's knowledge. This means it is a list of the contacts that are recognised by the server and thus can have a status.
- FAVOURITES: it reads the contacts marked by you as " PrivateWave favorites". It's a selection of contacts you choose to have apart, in order to make speed calls.
Contact status
 | Online | The contact is reachable. You can make a secure call to the user. |
 | Offline | The contact is not reachable, because is not under network coverage or is offline. You can try to make a secure call but the call will likely fail |
 | Error | There is a comunication error between your phone and the server. The contact status is unknown, anyway you can try to make a secure call |
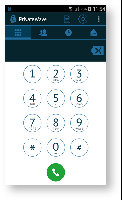
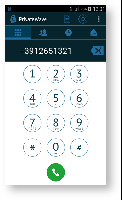
Calling by dialpad
You can make a secure call to any arbitrary number (presuming that the call peer has PrivateWave connected) from PrivateWave menu by simply entering the number with the on-screen keypad and pressing the dial (green) button.
Receiving a secure call with PrivateWave
Once PrivateWave is installed and all the settings are correctly configured on your device you are able to receive a secure call. When a secure call arrives to your device a notification bar will be shown on the top of the screen. Tap on the notification to bring the application in foreground, then answer or decline the call from the application. After the system have exchanged and verified the security keys the you can start the conversation.
To receive a secure call, PrivateWave has to be running and be connected to the Internet.
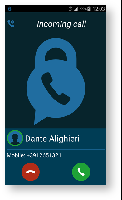
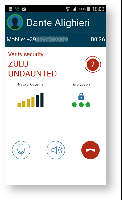
figure 4. you are receiving a secure call
|
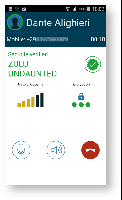
figure 5. call secured and in progress
|
Checking call security
PrivateWave call is always encrypted. To check that nobody is intercepting the call, you must verify the security verification words with you remote party. After the call has been connected PrivateWave displays the same two security verification words at the bottom of the screen to both parties. If both of you and your contact see the same security verification words then the call is secure. The security verification words are different each time you make or receive a secure call. If the words are not the same hang up the call immediately as this may be a sign of a security attack.
Call status
To establish a call PrivateWave completes three phases shown by two icons:
Call status icons
| Red light | Starting the connection | Connection not yet established. This step may take several seconds |
 | Yellow light | Key exchange | Connection established: encryption keys are being exchanged. |
| Green light | Secure call established | Connection established and secure. You can now speak securely |

Inviting your contacts
Using your address book, you can invite your contacts to join PrivateWave .
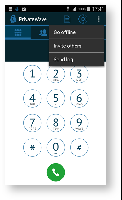
figure 7. Select "Invite others"
|
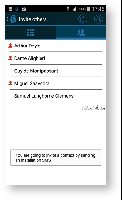
figure 8. choose from your address book
|
Open PrivateWave figure 7. Select "Invite others" select “Invite others” from the option menu and choose the contacts to whom you want to make secure calls. They will receive a text message including the installation link so they can also install PrivateWave . You can also enter manually the phone number using the dialpad
History
Every event performed or received on your PrivateWave is listed into the "History" tab, which can be displayed by pressing "Recent" icon on the tab bar.
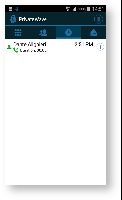
figure 9. recent event list
|

figure 10. event detail icon
|
Each event has a detail icon (the clock that ends each event line shown in (figure 10. event detail icon).
By clicking on this icon you have access to event's details (cfr figure 11. event detail).
Secure Messages
You can communicate with your peers by text messages using the Secure Messages System which provides Secure Messages. A Secure Message is a text message that travels into the same encrypted architecture of the Secure Call.
The maximum length of a single message is 160 character
- If PrivateWave is configured with PIN disabled each Secure Message has a time validity, after which it expires. Expiration means that the Secure Message content is no longer readable and it's gone for good. Instead of message content you'd rather read "Message received" or "Message sent".
- if PrivateWave is configured with PIN enabled each Secure Message is persistent.
If you disable PIN or use duress code all messages and calls history will be deleted from PrivateWave .
Secure Message System need specific abilitation. If the service is not available on your device please contact your support team to check it's enabled on your account.
Sending Secure Messages from "Messages" tab
Sending Secure Messages from "Messages" view is very easy and straight forward.
|
figure 13. Open Message History view
|
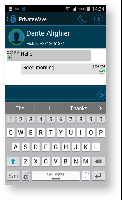
figure 14. Android Composer
|
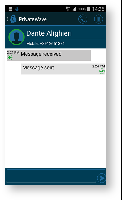
- If the conversation already exist in "Messages" view, then just tap on its entry to pop-up composer and write your Secure Message (as in figure 13. Open Message History view).
- If you want to start a new chat by Secure Messages, then just tap + icon highlighted on the top right side of PrivateWave . Contact list will pop-up, tap on contact to whom you want to send Secure Message and composer will popup (as in figure 14. Android Composer) and now you are ready to write your secure message.
- It is also possible to insert a phone number, composer will popup figure 14. Android Composer and now you are ready to write your secure message.
Sending Secure Messages from "Contacts list" tab
Secure Messages are also available from "Contacts list" tab.
![]()
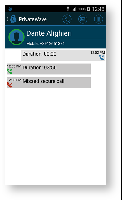
You have to select a contact from the list shown in figure 2. your address book is shared with application, tap on the contact and show its details figure 15. contacts list details, click on send secure message icon next to star highlighted, composer will pop up .
Secure Messages status icons and known limitations
Each Secure Message is displayed with an icon showing its status. Most important icons are:
| Icon | Meaning |
|---|---|
 | Sending Message |
 | Message Delivered |
 | Error sending Message |
There are few known limitations in the current Secure Message System:
Actually it's not possible to use Secure Messages in order to chat with multiple people (ie it's not possible to create chat rooms).
Please note that the body of each Secure Message you send or receive will be deleted after 15 minutes you read or wrote it.