By default, PrivateServer's services runs on all network interfaces. Actual availability depends on embedded firewall, which can be configured.
You can decide how to distribute the services of PrivateServer using the "network segregation" tools which you can access via the Services link in the main menu.
2.2.1 Services
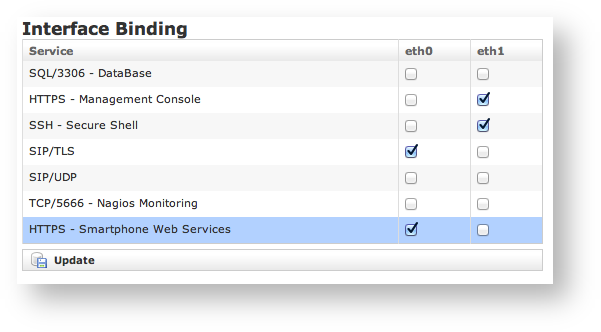
The page is divided in three parts: the first one is actually about the network segregation itself:
figure 1. Application Matrix shows a simple matrix made from services and NICs thus you can choose which service would be accessible on which interface and in this way profile your network design accordingly.
The Applications are the following:
- SQL/3306 - DataBase: that's the remote access to the DBMS (Data Base Management System), useful for exporting views and access data used by the appliance
- HTTPS - Management Console: here you have the very same web administrative console you are actually using
- SSH - Secure Shell: the well known secure text console for remote administration. This is useful for extraordinary management tasks.
- SIP/TLS: VoIP signaling protocol, protected by TLS connection, for secure calls.
- SIP/UDP: VoIP signaling protocol, without protection, useful to connect company and/or legacy PBX that do not support secure calls.
- TCP/5666: by activating this service it becomes possible to reach the Nagios monitoring service on the appliance.
- HTTPS/SmartPhone Web Service: Services provided by the PrivateServer in order to make the PrivateGSM clients work fine:
- Licence Cache
- Presence
- Provisioning
Please note that the configuration shown in figure 1. Application Matrix represents a likely production one as suggested in PSAM 2.9 Suggested network configuration
The NICs on the appliance are automatically detected by PrivateServer and listed here.
After you're done, just press the "Update" button to apply your configuration.
The NIC are shown as applicable even if they are not configured, so please check your Network configuration before assigning or deverting a service from a NIC.
2.2.2 TLS Certificates
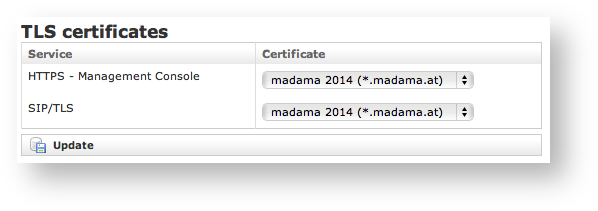
The second part is about certificate assign. When you divide your services amongst the NIC you are using them on different IPs as well. This implies you might choose different certificates each one related to each IP of the NIC your service is bound to.
As shown in the above figure 2. Certificates management, two are the services that need a valid certificate in order to guarantee the proper security levels:
- HTTPS - Management Console
- SIP/TLS
In both cases the goal is to avoid MITM (Man In The Middle) attacks and to identify the server's identity without possible mistakes. In case number 1 the certificate identifies the server in order to Administration Web Interface. In case number 2 it works the same way for the Secure VoIP service.
So we need to install a proper certificate for the HTTPS interface's hostname and then we have to bind it to the HTTPS service to in order to have a "closed padlock" web connection without warnings or exception to be added by the user.
Quite the same behaviour stands for the SIP interface, although in this case the PrivateGSM is the client and it's not going to be connected to the SIP/TLS service unless a proper certificate is issued.
Please consider that the certificates are strictly bounded to the name they are released for, so you make sure you assigned via DNS the proper name to the IP where the service is published
You can load as many certificates as you need and then assign one of them to one of the two above services, as it suites you better.
After you're done, just press the "Update" button.
2.2.3 Provisioning
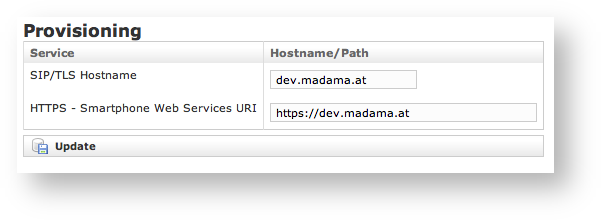
The third part is about configuring the hostnames that are going to be used for provisioning service.
The SIP/TLS Hostname is the name of the PBX which would be included into the provisioned configuration to be sent to the client. This hostname will be used to furnish the Secure VoIP service.
It's important that this name matches the public hostname for the Secure VoIP service or all the provisioned configuration won't work.
The HTTPS - Smartphone Web Services URI is the base URL for downloading both the PrivateGSM application and its configuration. This can be perceived as tricky but here's how it works. When we send an Automatic Activation SMS (cfr PSAM 2.7 Automatic Activation) what we really send is the URI for the configuration resource. This resource is MIME formatted so that the Mobile OS knows it needs PrivateGSM in order to manage it. Thus when the customer clicks on the URI in the SMS, the operating system opens the browser, contacts via HTTPS the server hostname we specified here and ultimately asks for the configuration resource. Then (via the MIME configuration) it asks PrivateGSM to handle it. Once you understood this mechanism it should be pretty straightforward what this field is about: it's the protocol://hostname part of the link that would be sent for any automatic activation.


