Latest update
Set HTTP User and Password as well as Administrator Password
On first run of Snom we strongly recommend that you secure the web interface in order to protect your phone against remote attacks. Therefore the HTTP User and Password as well as the Administrator Password should be changed from the default value.
Setting-Up the phone for TLS
Server Authentication
Your phone also acts as a client in a couple of cases. E.g. if you register to a secure SIP proxy or if you open a Action URL over HTTPS. Normally, you do not need to worry about the server identification. Snom phones do not verify server identities by default. From FW version 8.2.30 you can explicitly state to verify server certificates though. You can activate the feature on the certificates page of the web interface:
Please carefully enable the feature. The phone will reject all secure connections of peers offering an unknown certificate that could not be verified by one of build-in CA's of the snom phone. Please refer to the Certificate Authorities tab to see which authorities are supported by the phone. Due to security concerns, you can only disable the feauture by resetting the phone to the factory defaults.
Adding Unknown Certificates
The phone will reject a connection if it could not verify the identification with the delivered certificate from the server. A notify appears on the screen:
A certificate is trusted if its signature is signed by a certificate authority. Snom has pre-installed a couple of CA's which are listed on the Certificate Authorities tab of the Certificates page.
All rejected certificates are listed in the Unknown Certificates tab.
If you persist on trusting the identification you can add it as an exception (cfr fig 3. Add an Exception for the unknown certificate).
Henceforward, the certificate is listed in the Server Certificates tab and a connection to this identification is no longer rejected. Currently, this is the only way to add unknwon server certificates to the phone.
Manually Uploading Certificates
In admin mode, you can manually upload certificates in the Unknown Certificates tab. Every attempt to upload a unknown certificate will fail. Please refer to the log and assure your certificate is in DER format and is either signed by one of phone's authorities or server certificates.
Basic Configuration of the SNOM 300/320:
Open the Web User Interface of the SNOM
| Step 1 | Step 2 |
|---|---|
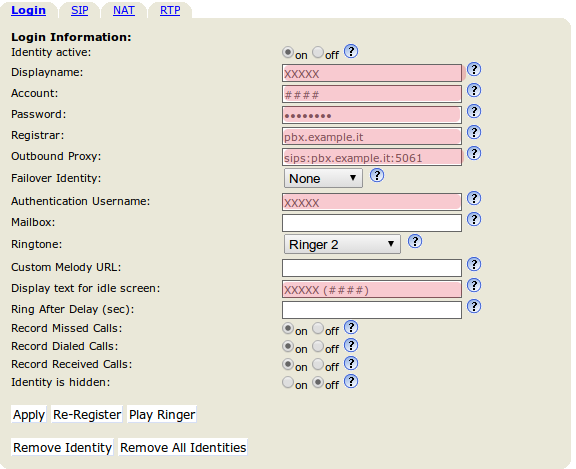
Navigate to the Setup/Identity1 page, login tab:
| Goto in the Setup/Identity1 page, SIP tab:
|
| Step 3 | Step 4 |
|---|---|
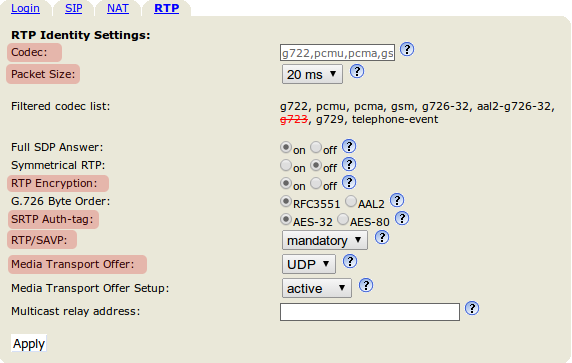
Goto in the Setup/Identity1 page, RTP tab:
| Goto in the Certificates:
|
Advanced Configuration of the SNOM 300/320:
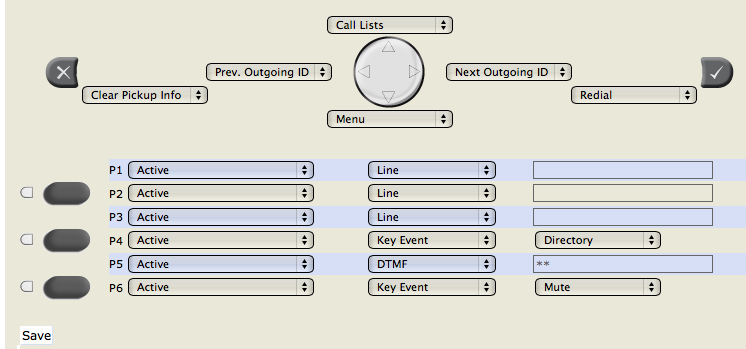
With the Advanced configuration we enable on the SNOM phone the "3-way call" and the "call transfer" functions.
| Step 1 | Step 2 |
|---|---|
Navigate to the Setup/Function Keys page:
|
|
| Step 3 | Step 4 |
|---|---|
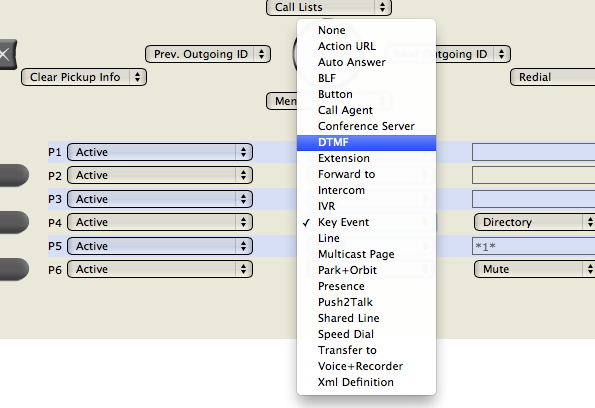
| Insert the "*1*" string in the third column: These DTMF activate the transfer mode. | Act the same way for another dial button (i.e. P4) but this time insert the "*3*" DTMF train: this one activates the "3-way call" |
Procedure for upgrade firmware
The official firmware supported by PrivateWave is 8.7.3.19.
a. Open the Web User Interface of the snom and navigate to the Software Update page.
b. Copy and paste this URL:
http://provisioning.snom.com:80/download/fw/snom300-8.7.3.19-SIP-f.bin
into the Firmware field and press load
c. The phone reboots and may ask you to perform the update, click ‘Yes’.
After that, the phone is upgraded to version 8.7.3.25.


