How to Configure PGSM professional with dual SIM
Install PGSM from Market.
Open the phone settings → "SIM Card Manager" $text.replaceAll("]*>"," ").replaceAll("\s*\z","").
Check both SIM are active on device $text.replaceAll("]*>"," ").replaceAll("\s*\z","").
To decide which SIM to use to send self-reg SMS and register PGSM with the number desired → go to Data service network and choose SIM 2 for data connection (My case i will be using SIM 2 to self-reg to Privateserver) $text.replaceAll("]*>"," ").replaceAll("\s*\z","").
Open the phone settings → More networks $text.replaceAll("]*>"," ").replaceAll("\s*\z","") → Check under "Mobile Networks" that the mobile Network mode SIM 2 $text.replaceAll("]*>"," ").replaceAll("\s*\z","") is set to LTE/WCDMA/GSM (auto connect) $text.replaceAll("]*>"," ").replaceAll("\s*\z","").
To receive calls on both SIM check Receive incoming calls in General Tab
From drop down tap on SIM 2 to make it as the default connection for DATA and SMS $text.replaceAll("]*>"," ").replaceAll("\s*\z","").
Open PGSM and start step by step for the automatic activation Wizard.
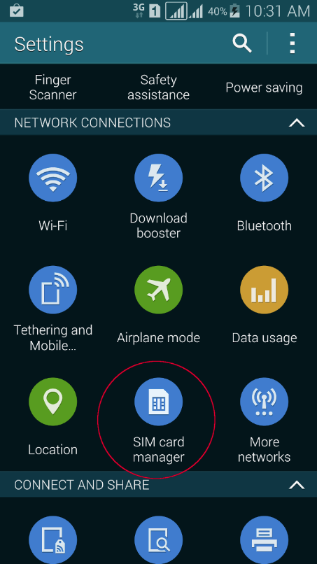 Figure 1. SIM Card Manager
|
Figure 2. Both SIM are active on device
|
Figure 3. Data Service Network SIM 2
|
|
Figure 4. More Networks
|
Figure 5. Mobile Network Mode SIM 2
|
Figure 6. Network_Mode_LTE
|
|
Figure 7. Drop Down tap SIM 2
|
|