...
Select the default provisioning profile and a group for the newly account created. Upload the file and click create: you'll be leaded to the Group list page
| Anchor |
|---|
| account_details |
|---|
| account_details |
|---|
|
1.1.1.4 Account's detailsThe figure | Xref |
|---|
| AnchorName | new sip account |
|---|
|
shows the last step of the procedure for account creation, but it's the same view you can get clicking on the Details link in the first column of the account's list (as in | Xref |
|---|
| AnchorName | sip users table |
|---|
|
.
...
From this summary of the account's configurations you can manage the account itself. It's possible to Send Installation Sms or to Send Activation Sms, action which we explain in
| Xref |
|---|
| AnchorName | automatic_activation |
|---|
|
, explore deeper in paragraph 1.1...
To change the SIP Account values you need to reach the form showed .4, as well as to Disable account. The last action inhibits the user to call or to be called and a specific Audio Message is issued by the PrivateServer to inform the user.
It's also possible to Edit the account's settings (more about this in the paragraph 1.1.2), Refresh account's data (which is proved to be quite useful to monitor the Text Messages status, like the Installation clicked) or simply Delete (paragraph 1.1.3) the account itself. In the following paragraphs you'll read more about account's management.
| Anchor |
|---|
| account_update |
|---|
| account_update |
|---|
|
1.1.2 Account Update
To change the SIP Account values you need to reach the form showed in | Xref |
|---|
| AnchorName | show_account_configuration |
|---|
|
, which has been explained in the paragraph 1.1.1.4. Once there, you can just press the Edit button at the bottom.
| Subtitle |
|---|
| Prefix | figure |
|---|
| SubtitleText | form for changing account's parameters |
|---|
| AnchorName | edit_account_form |
|---|
|
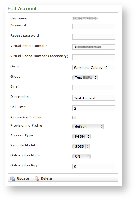 Image Added Image Added
|
In the form that would be presented to you (shown in | Xref |
|---|
| AnchorName | showedit_account_configuration |
|---|
|
, which has been explained in the previous paragraph. Once there, you can just press the Edit button at the bottom.
Change the values you need to and then ) it's possible to change any value you need to. Once you're done, click on the Update button at the bottom of the form to save the changes. The new values are shown into the Accounts' table back in the "Account List" page.the form to save the changes.
| Subtitle |
|---|
| Prefix | figure |
|---|
| SubtitleText | The Account the account has been updated |
|---|
| AnchorName | account_updated |
|---|
|
Image Removed |
...
| Info |
|---|
A line will warn you about the update. |
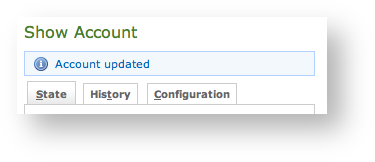 Image Added Image Added
|
As shown in
| Xref |
|---|
| AnchorName | account_updated |
|---|
|
the Web Console would warn you after the updated was processed. You can check the changes clicking on the Configuration tab.| Anchor |
|---|
| account_delete |
|---|
| account_delete |
|---|
|
1.1.3 Delete
Select the Account from the Account List and get the Edit Account page. Click on the Delete button at the bottom of the page to delete the SIP Account. A warning pop up window will be shown.
...