...
| Subtitle |
|---|
| Prefix | figure |
|---|
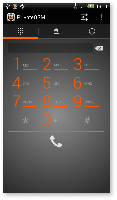
| SubtitleText | application main view |
|---|
| AnchorName | android home |
|---|
|
 |
| Subtitle |
|---|
| Prefix | figure |
|---|
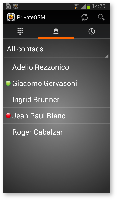
| SubtitleText | your address book is shared with PrivateGSM |
|---|
| AnchorName | android dial |
|---|
|
 |
| Excerpt Include |
|---|
| Making a secure call with PrivateGSM |
|---|
| Making a secure call with PrivateGSM |
|---|
| nopanel | true |
|---|
|
| Info |
|---|
To make a secure call, you and the called party must have PrivateGSM software running on the mobile device, be connected to the Internet and to the same SIP server. |
You can make a secure call to any arbitrary number (presuming that the call peer has PrivateGSM connected) by selecting the “DialPad” tab and entering the number.
...
| Subtitle |
|---|
| Prefix | figure |
|---|
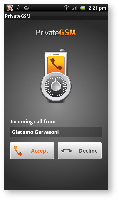
| SubtitleText | you are receiving a secure call |
|---|
| AnchorName | android receiving call |
|---|
|
 |
Call connection phases
To establish a call PrivateGSM completes three phases shown by three icons:
 Image Removed Image Removed | 1. Red light: the connection is starting. This step may take several seconds. |
|---|
| Image Removed | 3. Green light: secure call is established. You can now speak securely. |
...
| Excerpt Include |
|---|
| Checking the call in progress |
|---|
| Checking the call in progress |
|---|
| nopanel | true |
|---|
|
Checking your security
A PrivateGSM call is always encrypted. The call is automatically secured during the call setup. As soon as the call is established you can immediately start to talk securely with your call peer.
...