...
Obfuscation Mode
The Obfuscation mode is a simple but quite efficient trick to let the VoIP pass without being recognised by router that could perform Quality of Service degrading the call.
It's not known to be a perfect mask and it aims not to be one, still it works fine until now and our suggestion is to keep it enabled as by default,
Obfuscation Key
The key used by the obfuscator can be an arbitrary one, still "9" is the default value. It doesn't matter which number you put in here as long as it is the very same one you set up on the client side.
| Warning |
|---|
If the Obfuscation Key value is not the same on both client's account and server's one, then the call won't be placed properly and it might end suddenly voiceless. |
| Xrefanchor | ||
|---|---|---|
| ||
Keep-alive Enabled |
| Info | ||
|---|---|---|
| ||
Since the present version you can enable a server side check on the user's reachability! |
To be reachable the client must set up a stable socket to the server. Each client sends a "keep alive" request to the server it's connected to in order to keep up the socket. This is necessary as the TCP socket has an idle timeout after which the socket is closed. Some aggressive network devices can short the standard timeout under 10 minutes, making impossible for the client to send the "keep alive" request because it would always be late (the client sends its request every 10 minutes or so).
In order to avoid the socket break caused by such aggressive network devices, you can set up a server side "keep alive" request that is going to be performed every 3 minutes. In this way you can be sure that the socket and thus the connection would remain up and stable under every circumstances.
| Note |
|---|
The downside of this option is that there will be some more traffic on the socket (each passage of the request is 1.8 KiloByte, thus you can count almost 3.6 KB of traffic every 3 minutes) |
| Warning | ||
|---|---|---|
| ||
This option can afflict the battery life since more traffic means more radio transmission and on same devices the radio wouldn't have a proper timeout for going idle. |
The actual default value for the keep-alive interval is 60 seconds. You can configure the general keep-alive timeout in the NAT configuration form. Please read PSAM 2.4 Asterisk advanced configurations to get informations about it.
| Warning | ||
|---|---|---|
| ||
All the PrivateGSM clients prior to the 11.1 version cannot respond to the keep-alive request and thus if such option was enabled for their users, then those users won't ever be on-line and reachable. |
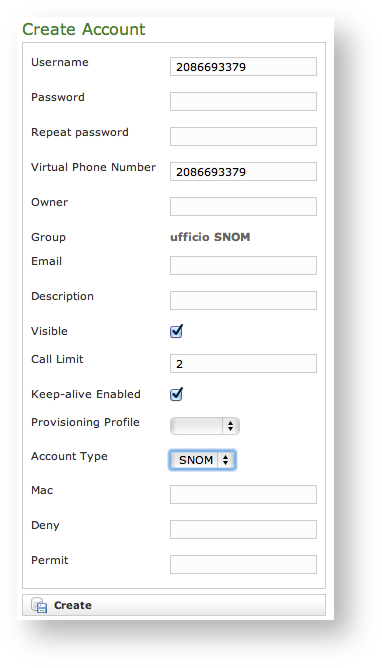
1.0.3.1.2 SNOM
In the Account List page (
| Xref | ||
|---|---|---|
|
| Subtitle | ||||||
|---|---|---|---|---|---|---|
| ||||||
|
There are some few but still important differences between the
| Xref | ||
|---|---|---|
|
| Xref | ||
|---|---|---|
|
- Mac
- Deny
- Permit
Mac
The Mac is for putting in the MAC Address of the SNOM in order to bind the user to a specific hardware.
| Warning |
|---|
| This option is a legacy from the older designs. Actually it's not used and is present only for retro compatibility. |
| Info | ||
|---|---|---|
| ||
| In the next version we foresee this option is going to be removed. |
Deny
Deny represent the blacklist based on the IP address and the net mask we want to deny when associated to the current user. You have to write this in the form: <ipaddress>/<network mask>
Examples:
- 192.168.0.38/255.255.255.255 : Denies traffic from this IP address
- 0.0.0.0/0.0.0.0 : Denies every address
Permit
Permit is the exact opposite of the Deny option. It represent the whitelist based on the IP address and the net mask we want to have access. You have to write this in the form: <ipaddress>/<network mask>
Examples:
- 192.168.0.38/255.255.255.0 : Allows traffic from this Network
| Tip | ||
|---|---|---|
| ||
You may have multiple rules for masking traffic. Combining together the Deny and the Permit option let you have a fine grain rule of access for any single user's account. Please keep in mind that the access rules are processed from the first to the last, meaning that the Deny will be used first and then will be analysed the Permit one. So: Deny: 0.0.0.0/0.0.0.0 Permit: 216.27.242.66/255.255.255.255 Deny every address except for the only one allowed. |
1.0.3.1.3 Actually create the Account
...
To use the automatic activation even in the plain way go reading thethe
...
Xref AnchorName automatic
...
._activation
1.0.3.2 Create a new account, the wizard way
...
| Xrefanchor | ||
|---|---|---|
| ||
1.0.3.6 Automatic Activation
After you created your new account(s) you have to configure the customer's client application PrivateGSM. In the wizard way it's MANDATORY to use the automatic activation in order to enable the account. In the plain way it's optional, though useful.
...