...
2.1 Accounts
...
creation
Once you have almost one group you can fulfill it with SIP Accounts. In the Group List (PSOM 1.0 Groups) click on the Accounts icon on the right of each group's row.
...
Each one is going to be detailed in the next paragraphs.
...
2.1.1 Create a new account, the wizard way (automatic activation)
The "wizard way" is the new method for creating accounts. It's made for easing the load on the service manager's shoulder, letting him/her focusing on the service configuration without having to bother about the installation and configuration of the client.
...
| Warning |
|---|
In the "wizard way" the user's account are DISABLED until the automatic activation is performed! |
...
2.1.2 Create a new account, the plain way (manual configuration)
The "plain way" is a completely manual creation of the account. In this way you control any feature of the account, but you also need to configure the user's client manually. This way is the opposite of the automatic activation.
...
You can create both PGSM (
| Brand | ||
|---|---|---|
|
...
2.1.
...
2.1 PGSM
| Subtitle | ||||||
|---|---|---|---|---|---|---|
| ||||||
...
Username
Password/Repeat Password
Virtual Phone Number
Account Type
Security Model
Obfuscation Mode
Obfuscation Key
Keep-alive Enabled
Username/Password
Username field is automatically generated as a random numeric value and you are not required to change it. Type in a password and repeat it in the proper fields.
| Warning |
|---|
If you manually edit Username field, keep in mind that it MUST be unique, as Virtual Phone Number! |
Virtual Phone Number
Set a Virtual Phone number as a numeric value of your choice. Please consider that the Virtual Phone Number is the number to be dialed to call the Account (and also the number shown as the caller, when the Account dials a call). We suggest a three character number such as "111" or "123" for SNOM devices and actual mobile phone number for
| Brand | ||
|---|---|---|
|
...
| Note |
|---|
It's still possible to perform an Automatic Activation or to send the installation URL on iPads or devices without phone features using the Provisioning Messages. |
Account Type
To configure a
account select "PGSM" by the drop down menu in "Account Type".Brand brand client To configure a SNOM account select "SNOM" by the drop down menu in "Account Type".
Obfuscation Mode
The Obfuscation mode is a simple but quite efficient trick to let the VoIP pass without being recognized by network equipment intended to block or censor VoIP traffic.
It's not known to be a perfect mask and it aims not to be one, still it works fine up to now and our suggestion is to keep it enabled as by default,
Obfuscation Key
The key used by the obfuscator can be an arbitrary one, still "9" is the default value. It doesn't matter which number you put in here as long as it is the very same one you set up on the client side.
...
| Xrefanchor | ||
|---|---|---|
| ||
Keep-alive Enabled |
In order to receive secure phone calls,
| Brand | ||
|---|---|---|
|
| Brand | ||
|---|---|---|
|
...
| Warning | ||||
|---|---|---|---|---|
| ||||
All the
|
Virtual Phone Number (secondary)
This field is optional and rarely used, still it can prove itself quite useful if you need the account to be reachable by two different phone numbers on the same device. The secondary virtual number can't substitute the primary one, meaning that this field alone won't be accepted as a valid phone number. You still need to configure the primary phone number if you intend to make use of the secondary one.
| Info | ||||
|---|---|---|---|---|
Some example for using the secondary phone number are this scenarios:
|
...
2.1.
...
2.2 SNOM
In the Account List page (
| Xref | ||
|---|---|---|
|
...
There are some few but still important differences between the
| Xref | ||
|---|---|---|
|
| Xref | ||
|---|---|---|
|
- Deny
- Permit
Deny
Deny represent the blacklist based on the IP address and the net mask we want to deny when associated to the current user. You have to write this in the form: <ipaddress>/<network mask>
...
Example:
- 192.168.0.38/255.255.255.255 : Denies traffic from this IP address
- 0.0.0.0/0.0.0.0 : Denies every address
Permit
Permit is the exact opposite of the Deny option. It represent the whitelist based on the IP address and the net mask we want to have access. You have to write this in the form: <ipaddress>/<network mask>
Example:
- 192.168.0.38/255.255.255.0 : Allows traffic from this Network
| Tip | ||
|---|---|---|
| ||
You may have multiple rules for masking traffic. Combining together the Deny and the Permit option let you have a fine grain rule of access for any single user's account. Please keep in mind that the access rules are processed from the first to the last, meaning that the Deny will be used first and then will be analysed analyzed the Permit one. So: Deny: 0.0.0.0/0.0.0.0 Permit: 216.27.242.66/255.255.255.255 Deny every address except for the only one allowed. |
...
2.1.2.3 Actually create the Account
After you filled in the form (either the PGSM or the SNOM one), please click on the Create icon at the page's bottom.
| Subtitle | ||||||
|---|---|---|---|---|---|---|
| ||||||
...
| Tip |
|---|
An information line advice the operation just performed. |
You'll get back the Account List page List page and the table shows now your new user (
| Xref | ||
|---|---|---|
|
| Note |
|---|
Using this way makes the account enabled by default. |
To use the automatic activation even in the plain way go reading the 1.1.4 Automatic Activation.
...
2.1.3 Create a new account, the batch way
The "batch way" is an account creation mode designed specifically for large number of users to be created quickly.
Starting from Account List page
| Xref | ||
|---|---|---|
|
| Subtitle | ||||||
|---|---|---|---|---|---|---|
| ||||||
Prepare a .csv file with some account. The file must be formatted as the example below, keeping header names in the first row
| Code Block | ||||
|---|---|---|---|---|
| ||||
fullName,gsmNumber,email,securityModel,description Alessandro Bergamaschi,+391234567890,alessandro.bergamaschi@acme.com,end-to-site,Personal account Luigi Rossi,+3932456753,luigi.rossi@acme.com,end-to-site,Personal account Marco Bianchi,+39432242342,mbianchi@gmail.com,end-to-site,Personal account Mario Colombo,+394325346546,colombo.mario@acme.com,end-to-site,Personal account |
Select the default provisioning profile and a group for the newly account created. Upload the file and click create: you'll be leaded to the Group list page.
Once you've done you can choose whether to manually activate the user or to lean on the automatic activation.
| Anchor | ||||
|---|---|---|---|---|
|
...
2.1.4 Account's details
The figure
| Xref | ||
|---|---|---|
|
| Xref | ||
|---|---|---|
|
Three tabs are shown in the Account's details window:
- State
- History
- Configuration
State is the default view you get and shows if the Account is connected and his licence status.
| Subtitle | ||||||
|---|---|---|---|---|---|---|
| ||||||
History shows any relevant information about the account.
| Subtitle | ||||||
|---|---|---|---|---|---|---|
| ||||||
...
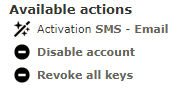
From this summary of the account's configurations you can manage the account itself. It's possible to Send Activation Sms, action which we explore deeper in paragraph 1.1.4, as well as to Disable account. Disable action inhibits the user to call or to be called and a specific Audio Message is issued by the
| Brand | ||
|---|---|---|
|
It's also possible to Edit the account's settings (more about this in the paragraph 1.1.2), Refresh account's data (which is proved to be quite useful to monitor the Text Messages status, like the Installation clicked) or simply Delete (paragraph 1.1.3) the account itself. In the following paragraphs you'll read more about account's management.
Anchor account_update account_update
| account_update | |
| account_update |
...
2.2 Update the Account
To change the SIP Account values you need to reach the form showed in
| Xref | ||
|---|---|---|
|
| Subtitle | ||||||
|---|---|---|---|---|---|---|
| ||||||
|
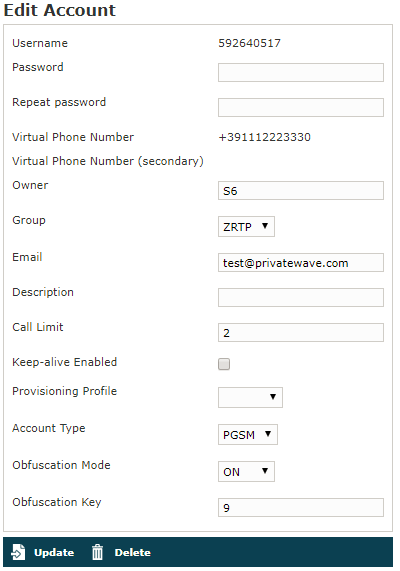
In the form that would be presented to you (shown in
| Xref | ||
|---|---|---|
|
| Subtitle | ||||||
|---|---|---|---|---|---|---|
| ||||||
As shown in
| Xref | ||
|---|---|---|
|
| Anchor | ||||
|---|---|---|---|---|
|
...
2.3 Delete the Account
In order to delete the account you have to access at the account details as described in paragraph paragraph 1.1.1.4. You have to get the Configuration details as in
| Xref | ||
|---|---|---|
|
| Subtitle | ||||||
|---|---|---|---|---|---|---|
| ||||||
Press it and confirm the deletion in the next warning pop next warning pop up window (
| Xref | ||
|---|---|---|
|
| Subtitle | ||||||
|---|---|---|---|---|---|---|
| ||||||
Once you're done, by pressing the the "Ok" button, the Account List page will be shown up without the Account and with a warning: see
| Xref | ||
|---|---|---|
|
| Anchor | ||||
|---|---|---|---|---|
|
...
2.4 Automatic Activation of the Account
After you created your new account(s) you have to configure the customer's client application
| Brand | ||
|---|---|---|
|
The Automatic Activation is quite useful in two occasions:
- after you just finished creating an user
- whenever you need a quick account's reconfiguration without involving too much the user
To be able to send text messages with the Automatic Activation you first need to get to get the Account list (
| Xref | ||
|---|---|---|
|
| Xref | ||
|---|---|---|
|
Confirm as in the above picture and the
| Brand | ||
|---|---|---|
|
| Subtitle | ||||||
|---|---|---|---|---|---|---|
| ||||||
|

| Warning |
|---|
The SMSs are sent to the account's Virtual Phone Number, so please check it exist as an actual mobile phone number before using the Automatic Activation |
Getting back to the account list you can read the exact status and the time of its change:
| Subtitle | ||||||
|---|---|---|---|---|---|---|
| ||||||
So what's happened is that the status has changed from "Created" to "Installation SMS sent" and "Activation SMS sent" and and the "Last Status date" has been updated to the time the SMS has been sent to the customer.
| Note |
|---|
The Automatic Activation and the Provisioning Profiles must be set up to have this procedure to work. |
After the customer has downloaded and installed the application, the "Last status" changes to "Installed" but the "Enabled" is still "False". "Last Status date" is updated as well.
After the customer has clicked on the "Activate" link in mobile web page he has opened you can know can know for sure that the user has configured his/her
| Brand | ||
|---|---|---|
|
Now the "Enabled" fields is changed to "true" meaning that the customer is ready to go.
| Note |
|---|
Please remember that if you created the account in plain way then the account is enabled by default, no matter if you sent the Activation SMS or not. |
If the customer actually goes on line with the
| Brand | ||
|---|---|---|
|
| Tip |
|---|
You can check if the customer is connected using the "Registered Clients" menu. |
| Anchor | ||||
|---|---|---|---|---|
|
...
2.
...
5 Disabling/Enabling an Account
If you need to temporary block any account in both directions so that he cannot place or receive calls, then you can just disable him. When a disabled account tries to perform secure voice actions a proper audio message is played warning about the account' status.
...
In order to disable an account you need first to reach the form shown in
| Xref | ||
|---|---|---|
|
| Subtitle | ||||||
|---|---|---|---|---|---|---|
| ||||||
|
Just press it and it will change as in
| Xref | ||
|---|---|---|
|
...
2.6 Searching an Account
You can search search a group's accounts with the search box on the menu bar of the Account list page.
...
| Info |
|---|
The search engine is based on Apache Lucene; see "Query Parser Syntax" for a detailed description of the full syntax of search queries. The field names that can be used in search queries are |
| Anchor | ||||
|---|---|---|---|---|
|
...
2.7 Licensing
All licensing system now in managed trough user account by accessing
| Xref | ||
|---|---|---|
|
...
Since the licence validation is an important component of the secure call, it's important that this difference in the behaviour of the client is fully understood by the Operator Manager. For instance if the Services weren't configured to let the HTTPS/SmartPhone Web Service be reachable on the public NIC, then the licence clients of any Automatically Activated
| Brand | ||
|---|---|---|
|
| Navbar |
|---|