...
Calling with PrivateGSM is a very easy . Select “Dial secure call”. After your address appears and select a contact to initiate a secure call.
...
task. You can both use your contact list or directly dial a number using the dialpad.
| Info |
|---|
To make a secure call, you and the called party must have PrivateGSM software running on the mobile device, be connected to the Internet and to the same PrivateServer server. |
| Subtitle |
|---|
| Prefix | figure |
|---|
| SubtitleText | PrivateGSM main menu |
|---|
| AnchorName | bb main menu |
|---|
|
 |
Select Contacts item from the main view, select on the contact you want to call and select the contact number associated with PrivateGSM, then press the "Call" button:
| Subtitle |
|---|
| Prefix | figure |
|---|
| SubtitleText | you address book is shared with PrivateGSM |
|---|
| AnchorName | bb select contact |
|---|
|
 |
| Excerpt Include |
|---|
Making a secure call with PrivateGSM | | nopanel | true |
|---|
Making a secure call with PrivateGSM | | Info |
|---|
| To make a secure call, you and the called party must have PrivateGSM software running on the mobile device, be connected to the Internet and to the same SIP server. |
| Subtitle |
|---|
| Prefix | figure |
|---|
| SubtitleText | Call button |
|---|
| AnchorName | bb_call_button |
|---|
|
 Image Added Image Added
|
As you can see in | Xref |
|---|
| AnchorName | bb select contact |
|---|
|
each contact can show a coloured ball at its left, or nothing at all. These are status marker and they represent the Presence Status for each contact. Presence
The Presence avoid users to call contacts who are not reachable, eg: because they do not have PrivateGSM activated and/or connected. The main value of this feature is to improve user experience suggesting the possible outcome of a call.
Starting with the present version, there are three lists:
- BASE: it lists all the contacts which are in the mobile address book, ordering them in the very same way.
- KNOWN: it shows only known contacts (registered or not) according to PrivateServer's knowledge. This means it is a list of the contacts that are recognised by the server and thus can have a status.
- FAVOURITES: it reads the contacts marked by you as "PrivateGSM favorites". It's a selection of contacts you choose to have apart, in order to make speed calls.
Each list may show a Contact status beside each contact. The contact status legenda is shown below:
Calling by keyboard
You can make a secure call to any arbitrary number (presuming that the call peer has PrivateGSM connected) by simply entering the number on PrivateGSM main menu and pressing the dial button (the one shown in
).
| Subtitle |
|---|
| Prefix | figure |
|---|
| SubtitleText | you can dial any number (even if it is not in you address book) |
|---|
| AnchorName | bb arbitrary call |
|---|
|
 Image Modified Image Modified |
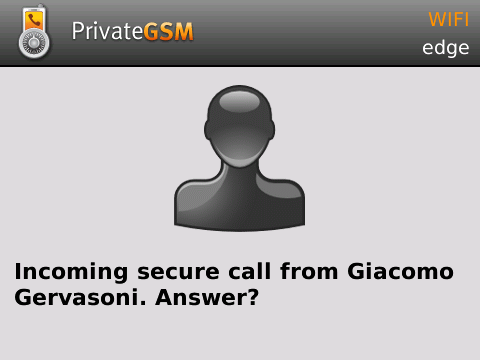
Receiving a secure call with PrivateGSM
Once PrivateGSM is installed and all the settings are correctly configured on your device, you are able to receive a secure call. PrivateGSM displays a screen when an incoming secure call is arrives to your phone. Press the Accept (green) button to allow the connection. After the system have exchanged and verified the security keys the you can start the conversation.
...
| Subtitle |
|---|
| Prefix | figure |
|---|
| SubtitleText | incoming call |
|---|
| AnchorName | bb incoming call |
|---|
|
 |
...
Call status
To establish a call PrivateGSM completes three phases shown by three icons:
Call status icons
 Image Added Image Added
| Red light | Starting the connection | Connection not yet established. This step may take several seconds |
 Image Added Image Added
| Green light | Secure call established | Connection established and secure. You can now speak securely |
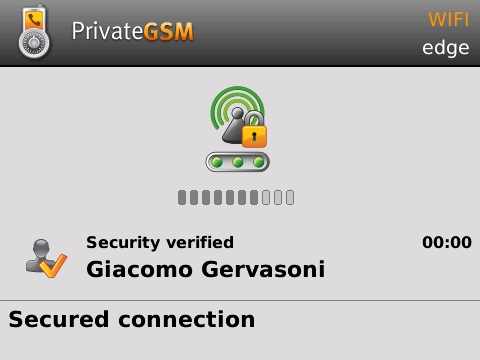
Checking your security
A PrivateGSM call is always encrypted. The call is automatically secured during the call setup. As soon as the call is established you can immediately start to talk securely with your call peer.
...
| Subtitle |
|---|
| Prefix | figure |
|---|
| SubtitleText | the call is secured |
|---|
| AnchorName | bb secured call |
|---|
|
 |
History
Every event performed or received on your PrivateGSM is listed into the "History" view, which can be displayed by selecting "History" item in the Main view.
| Subtitle |
|---|
| Prefix | figure |
|---|
| SubtitleText | recent event list |
|---|
| AnchorName | recent_log |
|---|
|
 Image Added Image Added
|
Events are displayed grouped on the account they are related to. So you'll have one line for each account who left a communication event into your "History".
| Subtitle |
|---|
| Prefix | figure |
|---|
| SubtitleText | event detail |
|---|
| AnchorName | event_log_detail |
|---|
|
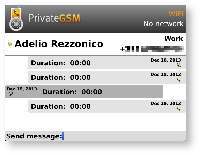 Image Added Image Added
|
| Subtitle |
|---|
| Prefix | figure |
|---|
| SubtitleText | central key |
|---|
| AnchorName | bb_central_key |
|---|
|
 Image Added Image Added
|
You can access event's details by selecting the line you're interested into and pressing the central key (the one shown in
) . An example of a detailed event related to Mr. Adelio Rezzonico is shown in | Xref |
|---|
| AnchorName | event_log_detail |
|---|
|
. Private Text Messages
You can communicate with your peers by text messages using the Secure Messages System which provides Secure Messages. A Secure Message is a text message that travels into the same encrypted architecture of the Secure Call.
| Info |
|---|
The maximum length of a single message is 160 character |
| Subtitle |
|---|
| Prefix | figure |
|---|
| SubtitleText | An example of secure messaging |
|---|
| AnchorName | secure message view |
|---|
|
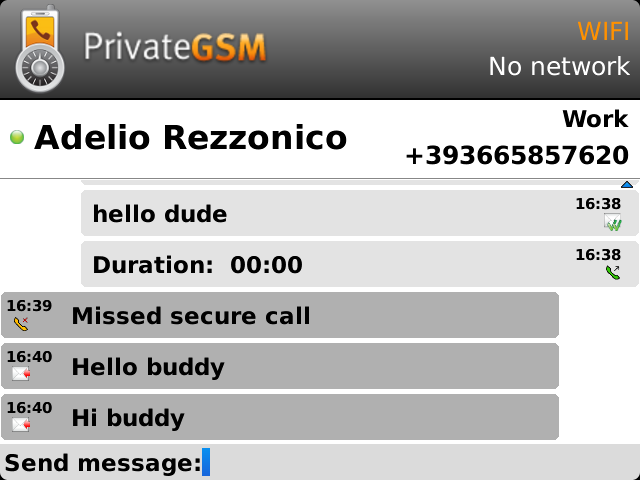 Image Added Image Added
|
Secure Messages rely on the very same security infrastructure the voice calls do. Plus for security each Secure Message is blanked 15 minutes after it's been read or sent.
| Subtitle |
|---|
| Prefix | figure |
|---|
| SubtitleText | blanked secure message |
|---|
| AnchorName | blanked_secure_message |
|---|
|
 Image Added Image Added
|
| Warning |
|---|
Secure Message System need specific abilitation. If the service is not available on your device please contact your support team to check it's enabled on your account. |
Sending Secure Messages from "History" view
Secure Messages are available via "History" view, specifically from the detailed view:
| Xref |
|---|
| AnchorName | event_log_detail |
|---|
|
. | Subtitle |
|---|
| Prefix | figure |
|---|
| SubtitleText | type a new Secure Message |
|---|
| AnchorName | typing_ptm |
|---|
|
 Image Added Image Added
|
| Subtitle |
|---|
| Prefix | figure |
|---|
| SubtitleText | "enter" keyboard button |
|---|
| AnchorName | bb_enter_button |
|---|
|
 Image Added Image Added
|
As you can see in : you can type Secure Messages and send them to your party by pressing enter button (cfr. | Xref |
|---|
| AnchorName | bb_enter_button |
|---|
|
).
Sending Secure Messages from "Contacts"
Secure Messages are also available from "Contacts" view.
| Subtitle |
|---|
| Prefix | figure |
|---|
| SubtitleText | contacts list tab |
|---|
| AnchorName | contacts_list_tab |
|---|
|
 Image Added Image Added
|
You have to select an account from the list shown in
| Xref |
|---|
| AnchorName | bb select contact |
|---|
|
and show its details by clicking on the blue icon displayed on its right side. Then you get a view like in | Xref |
|---|
| AnchorName | contacts_list_tab |
|---|
|
.Once you select the desired phone number of the account you want to send Secure Messages to, then you get the view shown in
from where you can type your message.Secure Messages status icons and known limitations
Each Secure Message is displayed with an icon showing its status. Most important icons are:
There are few known limitations in the current Secure Message System:
| Note |
|---|
Actually it's not possible to use Secure Messages in order to chat with multiple people (ie it's not possible to create chat rooms). |
| Warning |
|---|
Please note that the body of each Secure Message you send or receive will be deleted after 15 minutes you read or wrote it. |


