| Subtitle |
|---|
| Prefix | figure |
|---|
| SubtitleText | "Edit Sip Trunk" form |
|---|
| AnchorName | edit sip trunk form |
|---|
|
|
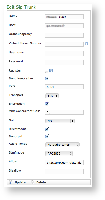
In
| Xref |
|---|
| AnchorName | edit sip trunk form |
|---|
|
you can see an example configuration for creating a SECURE Inbound SIP Trunk. The mandatory
fields values are:
- NAME: a meaningful name for this trunk
- HOST: IP address/hostname of the SIP server provided by ITSP
- PORT: registration port of the service
- CONCURRENT CALLS: maximum number of calls on a single trunk
- NAT: enable/disable the Network Address Translation configuration
- DIRECTMEDIA: experimental sound management in P2P mode without routing the audio stream through the server
- SENDRPID: the Remote Party ID, used to interconnect with VoIP Provider for the management of privacy
- AUDIO TONES: this is used for Audio Messaging. The possible values are:
- NO AUDIO TONES: no audio messages would be played on this trunk
- ON EARLY MEDIA: the audio messages would be played using SIP early offer
- ON ANSWERED CALLS: the audio messages would be played using SIP delayed offer
- DTMFMODE: tone signaling technology used for this SIP interconnection
- ALLOW: voice codecs used in this trunk
- DISALLOW: voice codecs denied in this trunk
The default values for Port, Allow and Disallow are usually work well, however feel free to change them to suite your needs better.
Mandatory fields are:
Register option
If the trunk is going to be also used for OUTBOUND calls (external calls) you need to be sure that the "Register" checkbox is checked. In this case the "Name" and "Secret" fields are mandatory as well. Otherwise you can uncheck the "Register" checkbox so the above fields will become optional.
Fill out the fields accordingly to the guidelines above and when you are done click on the "Update" icon at the bottom of the page.
| Subtitle |
|---|
| Prefix | figure |
|---|
| SubtitleText | The new SipTrunk List Table |
|---|
| AnchorName | new trunk list |
|---|
|
 Image Removed Image Removed
|
You can get back to the "Sip Trunk List" page where the Sip Trunk table is now filled based on your settings (
).A notification will inform you about the progress of the operation. The number shown in the notification is an internal identifier in the database and thus can be ignored.
To check the entered data of the SIP Trunk click on the "Host" value into the table (for example in this case you should click on "10.0.0.101"). This will open again the Edit Sip Trunk page with the previously entered data.
2.2.2 Change Inbound Trunk settings
On the Edit Sip Trunk page you can change the values of the Inbound Trunk fields. When you are done commit the changes by clicking on the Update icon.
Click again on the "Host" value and verify the values of the fields are actually changed.
2.2.3 Delete an Inbound Trunk
To delete a trunk you need to select it in the trunk list. Click on the selected trunk and you'll be taken to the Edit Sip Trunk page. Click on the Delete icon at the bottom of the page to delete the Sip Trunk.
| Subtitle |
|---|
| Prefix | figure |
|---|
| SubtitleText | The Sip Trunk List after the Trunk deletion |
|---|
| AnchorName | sip trunk deleted |
|---|
|
Image Removed |
A warning pop-up window will ask you for confirmation. After you click on the Ok button or press the Enter key on your keyboard you'll be taken back again to the "Sip Trunk List" page which will show an empty list and a notice as in | Xref |
|---|
| AnchorName | sip trunk deleted |
|---|
|
. 2.3 Outbound Configuration
Click on the "Outbound" link in menu on the left side so you get to the "Dialling Rule List" page. Here you can choose the default outbound trunk or set up the dialling rule to route the calls on a specific one.
2.3.1 Set the default Outbound Trunk
| Subtitle |
|---|
| Prefix | figure |
|---|
| SubtitleText | Default Outbound view |
|---|
| AnchorName | basic outbound view |
|---|
|
Image Removed |
As soon as the page is presented to you, you can see it as in
| Xref |
|---|
| AnchorName | basic outbound view |
|---|
|
. The upper side is about the Default Trunk used for outbound calls. By default any outbound call is Blocked and this behaviour stills until a SIP Trunk is chosen.| Subtitle |
|---|
| Prefix | figure |
|---|
| SubtitleText | choose the default outbound trunk |
|---|
| AnchorName | choose default outbound |
|---|
|
Image Removed |
To choose the default Trunk you just need to click on the "BLOCKED" tag and then you can use the drop down menu as in
| Xref |
|---|
| AnchorName | choose default outbound |
|---|
|
. | Note |
|---|
If no Inbound Trunk has been configured, then the drop-down menu is empty. |
Once you're done you can press the "Update" button to confirm your choice. You return to the "Dialling Rule List" page and this time the "Default Outbound" option is set to the trunk you choose.
2.3.2 Create Outbound routing by dialling rules
The Outbound Trunks can also be selected by dialling a prefix. If you need to create conditional routing rules for Outbound calls, then you need to use the lower section of the "Dialling Rule List" page (cfr.
| Xref |
|---|
| AnchorName | basic outbound view |
|---|
|
). | Subtitle |
|---|
| Prefix | figure |
|---|
| SubtitleText | The "New Dialling Rule" button |
|---|
| AnchorName | new dialling rule link |
|---|
|
Image Removed |
After you press the "New Dialling Rule" button (which is shown in
| Xref |
|---|
| AnchorName | new dialling rule link |
|---|
|
) you are redirected to the "Create Dialling Rule" form (shown below).| Subtitle |
|---|
| Prefix | figure |
|---|
| SubtitleText | "Create Dialling Rule" form |
|---|
| AnchorName | create dialling rule |
|---|
|
Image Removed |
2.3.2 Read Outbound routing by dialling rules
If your need is to set up a distinct rule
2.3.2 Update Outbound routing by dialling rules
If your need is to set up a distinct rule
2.3.2 Delete Outbound routing by dialling rules
...
- this is 5061 by RFC
- TRANSPORT: TLS
- ENCRYPTION: check it enabled
We do also suggest the following values to be set:
- AUDIO TONES: ON EARLY MEDIA works fine with the Cisco Unified Communications Manager.
- DTMFMODE: choose your values considering the PBX on the other end of the Trunk. Usually we suggest to choose the value RFC2833
- DIRECTMEDIA: enabled (checked)
- SENDRPID: enabled (checked)
Other fields in the form depend by your network topology and by the features on the other end PBX.
When you are done with your changes, commit them by clicking on the Update icon.
4.1.1 Certificate Management
In order to validate a TLS peer for establishing an Encrypted SIP Trunk, you generally have to import the other party CA Root. This is important because the peer TLS certificate could not match PrivateServer actual Certificate Chain and thus the validation would fail.
| Info |
|---|
PrivateServer comes with a bundle of the most known CA Roots certificates ready to be used. So this section is useful for minor certificate authorities and/or for self signed certificates. |
Please read 2.3.3 Add certification authority to understand how to import a new CA Root certificate.