2.2.1 Create a SECURE Inbound Trunk
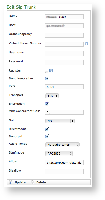
Once you've clicked on the New Sip Trunk (by following the instructions explained at 2.0.4 General starting point for SIP Trunk configuration) youto go to the Edit Sip Trunk page:
| Subtitle | ||||||
|---|---|---|---|---|---|---|
| ||||||
|
| Tip |
|---|
There are two types of trunk that you can create, depending on the authentication type:
|
| Tip |
|---|
The called number in inbound calls passing through the trunk should match the number of an internal account or a virtual phone number associated with an account. This way the correct SIP phone will ring. |
The default values for Port, Allow and Disallow are usually work well, however feel free to change them to suite your needs better.
Mandatory fields are:
- Host
- Port
- Allow/Disallow
Register option
If the trunk is going to be also used for OUTBOUND calls (external calls) you need to be sure that the "Register" checkbox is checked. In this case the "Name" and "Secret" fields are mandatory as well. Otherwise you can uncheck the "Register" checkbox so the above fields will become optional.
Fill out the fields accordingly to the guidelines above and when you are done click on the "Update" icon at the bottom of the page.
| Subtitle | ||||||
|---|---|---|---|---|---|---|
| ||||||
You can get back to the "Sip Trunk List" page where the Sip Trunk table is now filled based on your settings (
| Xref | ||
|---|---|---|
|
A notification will inform you about the progress of the operation. The number shown in the notification is an internal identifier in the database and thus can be ignored.
To check the entered data of the SIP Trunk click on the "Host" value into the table (for example in this case you should click on "10.0.0.101"). This will open again the Edit Sip Trunk page with the previously entered data.
2.2.2 Change Inbound Trunk settings
On the Edit Sip Trunk page you can change the values of the Inbound Trunk fields. When you are done commit the changes by clicking on the Update icon.
Click again on the "Host" value and verify the values of the fields are actually changed.
2.2.3 Delete an Inbound Trunk
To delete a trunk you need to select it in the trunk list. Click on the selected trunk and you'll be taken to the Edit Sip Trunk page. Click on the Delete icon at the bottom of the page to delete the Sip Trunk.
| Subtitle | ||||||
|---|---|---|---|---|---|---|
| ||||||
| Xref | ||
|---|---|---|
|
...