There are several kind of logs on PrivateServer:
- SIP activity logs
- Registered Accounts
- Web Authorization accesses
- Call Detailed Records
Each one is suitable to monitor a different part of the service.
4.0.1 SIP activity logs
The SIP Sessions page show the activities each Account did with the server.
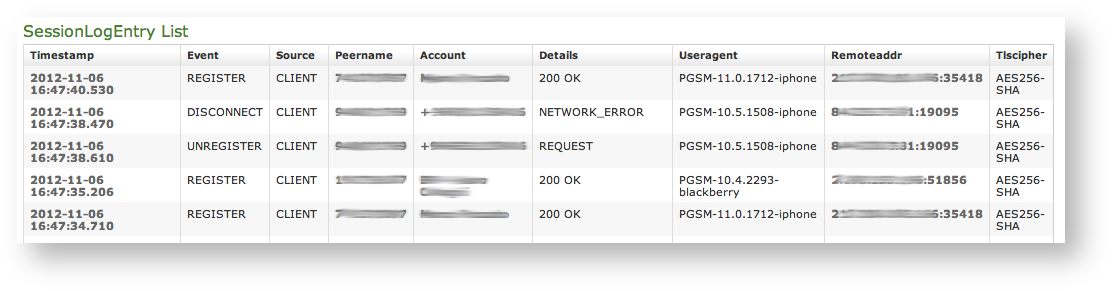
To get this list just click on the SIP Sessions entry in the main menu. The activities are listed by date and they give you a detailed overview of the SIP status for each one. These logs are very useful for debugging the networking issues on the client side.
The Event column lists the SIP events:
- CONNECT: PrivateGSM client opened a connection to PrivateServer. This usually means the client has been activated
- REGISTER: The Account has been correctly registered and is now on line
- UNREGISTER: The Account has been correctly unregistered and is now off line
- DISCONNECT: PrivateGSM client closed the connection. This usually means the client has been stopped.
4.0.2 Registered Accounts
If you want a full list of all the Accounts who are on line, then you click on the Registered Accounts entry in the main menu.
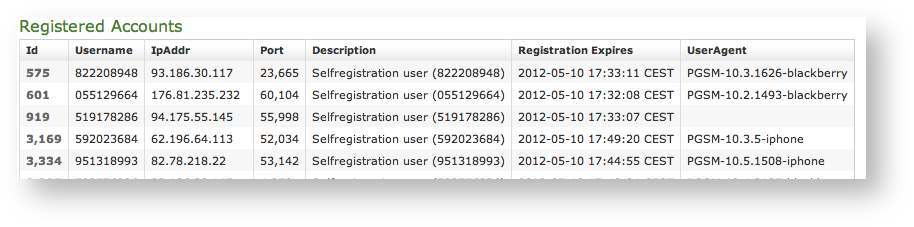
The list shows all the user actually on line and thus reachable on your PrivateServer. To read more detail about each user just click on its Id.
4.0.3 Web Authorization accesses
You can have a full view of all the access made to the management console.
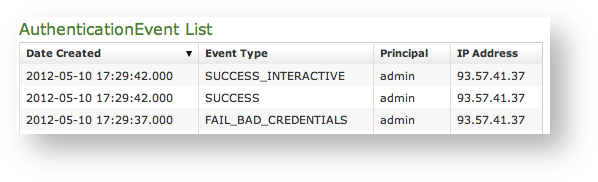
Just click on the Web Sessions entry in the main menu and you get a list as in figure above. It shows up the detail about the user (principal), the IP address used to connect, the date of each authentication and the outcome (Event Type).
4.0.4 Call Detailed Records
NEW FEATURE
In this version the CDR has been completely rearrange to better show the valuable informations
Despite its name the CDR is a debugging and quality assurance facility. It saves all the calls status, meaning it is very useful to understand is something is going wrong with you Secure Call Service.
To access the CDR you must click on the Call Detailed Record in the main menu. You'll get the "Cdr List" page which includes all the calls recorded.
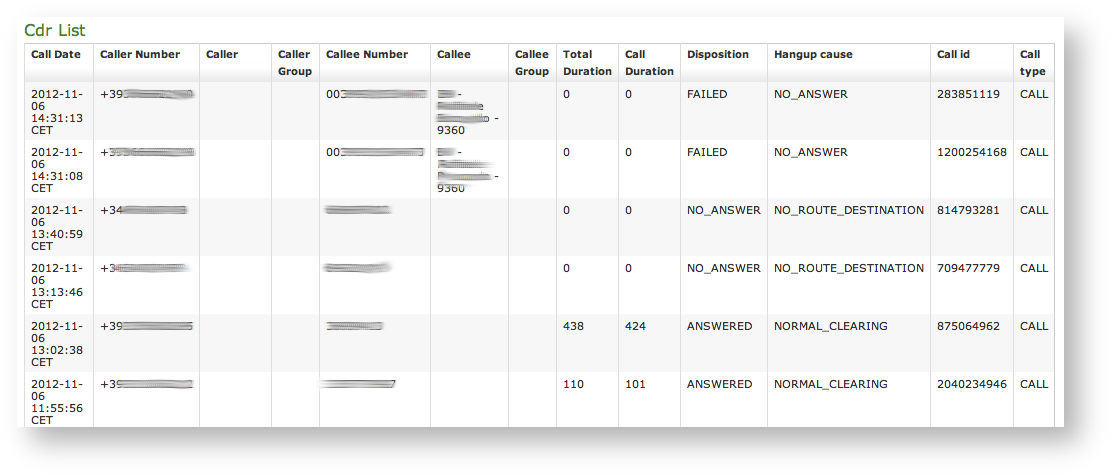
If the table is empty, please place a phone call between the two SIp Accounts. Then come back on this page and check that the call has been correctly registered. The shown fields are:
- Call Date: when the call has been placed
- Caller Number: The virtual phone number used to place the call
- Caller: The caller description, if any
- Caller Group: The caller's group description, if any
- Callee Number: The virtual phone number called
- Callee: The callee description, if any
- Callee Group: The callee's group description, if any
- Total Duration: how long the call lasted. Time elapsed from the moment the "Call Button" is pressed on the caller's client to the one in which the communication is closed at all
- Call Duration: how long the call lasted, just the voice
- Disposition: which result the call had
- Hangup Cause: how long the call lasted
- Call id: a unique number that identifies the call
- Call type: nature of the call performed
Relevant fields in CDR
The Disposition is very important because it tells you the exit code of each call. Possible codes are:
- ANSWERED: the call was taken by the callee
- NO_ANSWER: nobody picked up the phone to answer (mostly this is a time out code)
- BUSY: the callee refused the call
- FAILED: for some reason the call was not able to be placed
- NO_ROUTE_DESTINATION: The callee is not reachable because of network issues.
- NORMAL_CLEARING: Call closed normally.
- USER_BUSY: The user is busy.
- NO_ANSWER: The callee didn't answer and the call was closed for timeout reason.
- CALL_REJECTED: The callee rejected the call, as by pressing the "hold" button.
- BEARERCAPABILITY_NOTAVAIL: The caller and the callee were using different security models that are not compatible.
- NO_USER_RESPONSE: The same as in "NO_ANSWER", but this happens when the call goes out by Trunk.
- CALL: Usual call between two persons
- 3-WAY: Usual call (as above) with an added person during the call
- CONFERENCE: Conference call
- TRANSFER: Usual call that is transferred to a third person
4.0.5 Data Retention
NEW FEATURE
The "Data Retention" feature has been introduced in the present version.
The "Data Retention" is the new possibility that EVSS gives you to archive and store away some of the older data for consultation purposes.

You can access the functions of "Data Retention" using the menu entries shown in figure 3. Menu access to the Data Retention under the "SERVER CONFIGURATION" voice.
The first one is used to configure the Retention features, the latter for retrieving the information stored on the hard disk of PrivateServer.
4.0.5.1 Setup of Data Retention
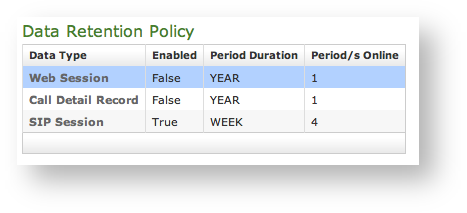
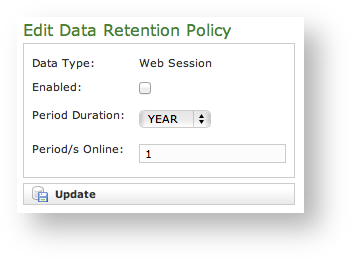
Each log entry listed in figure 4. Data Retention Policy list has an editor form as the one shown in figure 5. Data Retention Policy editor. Using the mentioned form you can:
- enable the Data Retention(Enabled checkbox)
- select the period to be kept on-line (Period Duration)
- choose how many archives you want to keep online (Period/s Online)
4.0.5.2 Retrieve the Data Archives
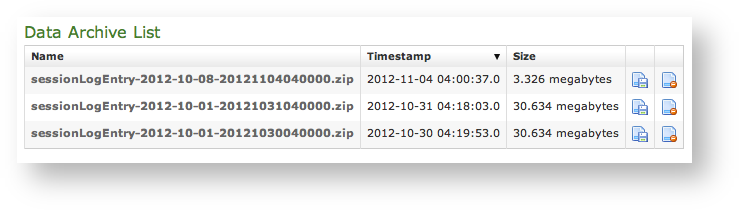
The "Data Archive List" is shown in the page body (see figure 6. Data Archive List). Each archive row shows its Name, its Creation Timestamp and its Size (all the columns are pretty self explaining).
The last two columns shows two icons: the first one is for downloading the archive, the second one is for deleting it.
It's possible to download the archive also by clicking on its name
If you choose to delete the archive, press the last column icon.
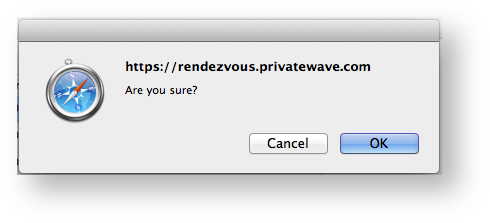
A confirmation is requested (see figure 7. The confirmation pop-up window). If you approve the action then the archive is removed from both the list and the hard disk of the appliance.
Point of no return action!
Please be aware that this action is not undoable! Once confirmed the deletion, the archive is lost forever!